FlexiBMS Lite Setup
Connecting to battery pack
Important! You may damage the BMS if you fail to follow these instructions.
When connecting to the battery pack connect B- and B+ first and balance leads last.
When disconnecting from the battery pack disconnect the balance leads first and B-/B+ last.
See the FlexiBMS wiki for more details.
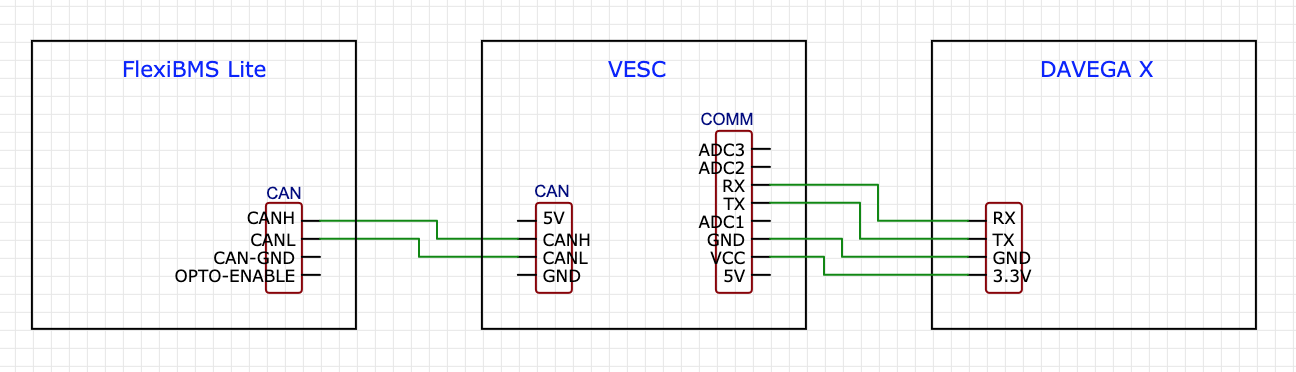
FlexiBMS + DAVEGA X wiring
The FlexiBMS Lite needs to be on the same CAN bus as the VESC® that the DAVEGA X is directly connected to via UART.
Wiring with a single VESC® setup.
Wiring with a dual VESC® setup. In this case you will need to Y-split your CANH and CANL wires.

FlexiBMS setup
FlexiBMS Lite can be configured using the serial connection via the USB port. Please read:
The following settings are recommended for use with DAVEGA X:
$31=1
$32=0
$38=1
$39=1
$40=1
This means:
- $31=1: stay active time is 1 hour
- $32=0: 5V regulator is not always enabled
- $38=1: 5V regulator is enabled in the standby mode
- $39=1: received CAN message extends the active time to 1 hour (if it's less than 1 hour)
- $40=1: CAN wake-up is activated
The 5V regulator is necessary for CAN connection to work. CAN connection is necessary for DAVEGA to be able to retrieve data from FlexiBMS by using the VESC CAN-forwarding feature.
The 5V regulator consumes extra energy and having it always enabled is not ideal. With the setup above, the 5V is only enabled if the BMS detects any incoming CAN communication. It's automatically disabled after 1 hour of idle time.
CAN ID
FlexiBMS Lite comes pre-configured with the CAN ID 10. This is where DAVEGA X will look for the BMS. The CAN ID can be changed in the FlexiBMS settings but please don't do that, otherwise your DAVEGA X will no longer be able to retrieve the BMS data.
DAVEGA X also supports dual FlexiBMS setups. In this case, the CAN IDs must be set to 10 and 11.